While correct tension adjustment is crucial, this article will touch upon a question that arises even earlier: the correct position of the tensioner. After all, our technical department regularly receives queries or complaints that a newly installed tensioner doesn’t manage to create the correct tension or does not allow for belt installation at all. Having thoroughly analyzed these episodes, we discovered that the problem, in most cases, could be traced to an incorrect tensioner position. Positioning the tensioner is not a self-evident process on all engines, and in some cases, mistakes are easily made. We will highlight a few examples to make this clear.
-
Hyundai/Kia 2.0 litre petrol engine G4GC
We will start with the Hyundai/Kia 2.0 litre petrol engine G4GC (K025457XS/T43135, from 2006 onwards). The tensioner in this drive is a classic tensioner with a double eccentric and a positioning/locating lug, which should fit in the right groove during the installation process. The groove, in this case, is a blind plug in the cylinder head. The tricky bit is that, a little higher up, there is the second blind plug. If you put the lug of the tensioner in this upper plug, you will not be able to fit the belt onto the tensioner pulley.
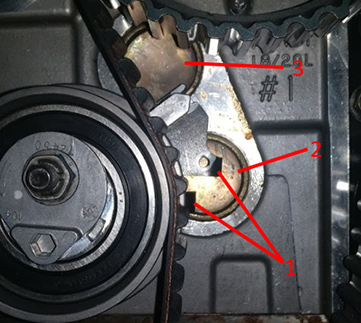
1: positioning lugs; 2: lower blind plug in the cylinder head; 3: upper plug in the cylinder head
-
Lada/VAZ 11186/21116 1.6 petrol engine in Kalina and Granta
The tensioner of our second example, that of the Lada/VAZ 11186/21116 1.6 petrol engine in the Kalina and Granta models (5670XS and related kits/T43228, from 2011 onwards), has a quite different design. While it has no positioning lug, the engine does feature two holes into which a tensioner mounting bolt will fit. Naturally, the tensioner will only perform its full range of functions if you screw the tensioner bolt into the correct hole: namely, the upper one. If you put the tensioner bolt in the bottom hole, the tensioner will fail to produce the proper amount of tension.[1]
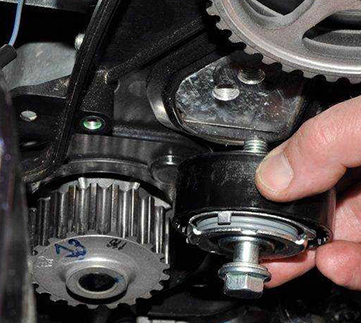
The two holes into which a tensioner mounting bolt will fit.
-
VAG 1.4 16V and 1.6 16V petrol engines
We’ve come to our third and last example, the VAG 1.4 16V and 1.6 16V petrol engines (5565Xs and related kits, from 1998 onwards). In this case, two belts and two automatic tensioners are used in the camshaft drives. There are, unfortunately, many ways to misplace the tensioners, leading to belt failure and/or engine failure. We have explained all these possible mistakes in more detail in a previous technical bulletin TB035.
Mind the position of the automatic tensioner
It’s no secret that the automatic tensioner (for the timing belt drive) helps maximize belt life and optimize the operation of the drive as a whole. Moreover, an automatic tensioner simplifies installation, thus eliminating the need for additional tension measurement after adjustment (with the help of a sonic belt tension tester STT-1 or other tools). Yet in order to do its job, it has to be installed correctly. Have you just installed a tensioner and are you experiencing difficulty creating the correct amount of tension or even mounting the belt at all? An incorrect tensioner position might be to blame, so be careful to avoid making mistakes when positioning the tensioner.
[1] The reason that this part contains two holes is because the same cylinder head is used on older engines as well. When working with the latter, the tensioner bolt does have to be screwed into the bottom hole.