As those of you who have installed (or are planning to install) our tensioner T43091 will know: this aftermarket part looks a bit different from the original VAG part. Rest assured, though, because our tensioner functions in exactly the same way as the OE tensioner and it meets all quality and performance requirements. It just comes with its own design and installation procedure. That’s why we strongly advise you to consult our Tech Tips whenever you are about to install one of our products.
These tips can be found in a digital version on Gates Techzone or together with the digital installation instructions for PowerGrip® kits. A failure to comply with the procedure described in our Tech Tips may result in severe mechanical problems.
This article is meant as a supplement to Tech Tip 020, to give you a complete picture and reduce the risk of confusion to an absolute minimum.
Picture 1: the retaining pin on T43091
Looking at the first picture in our Tech Tip 020, you immediately spot a visual difference between the VAG OE tensioner and the Gates tensioner. The second features a so-called retaining pin (circled in green). Thanks to this retaining pin, you don’t have to use a tensioner pulley locking tool to remove or to install the timing belt. Curious how this works? Let’s move on to pictures 2 and 3 to discuss (the absence of) the tensioner pulley locking tool.

Pictures 2 & 3: tensioner pulley locking tool
As you can see in picture two, to remove or to install a timing belt, you normally have to insert a tensioner pulley locking tool, so the tensioner can be rotated to its maximum, away from the belt. This allows you to easily install or remove the timing belt. However, when working with Gates tensioner T43091, you don’t need a tensioner pulley locking tool (see picture 3). After all, as we explained earlier, the Gates tensioner is equipped with a retaining pin, already holding it at its maximum position.

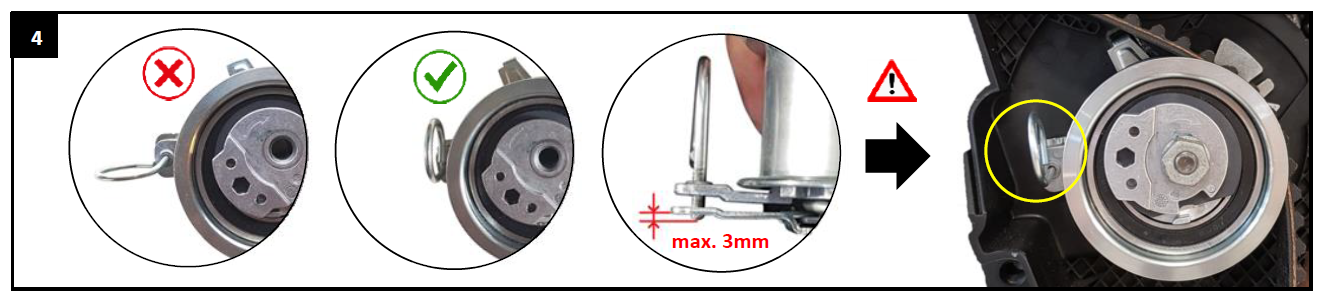
Picture 4: two installation prerequisites (two steps)
Picture 4, in turn, alerts you to the importance of two installation prerequisites: first, the position of the retaining pin and, second, the fact that the retaining pin shouldn’t stick out too much:
1. Before installing the Gates tensioner, you have to make sure it’s vertically positioned, otherwise it will hit the inner timing belt cover.
2. Also make sure that the retaining pin is not sticking out more than three millimeters. Otherwise it will hit the inner timing belt cover, causing belt misalignment.
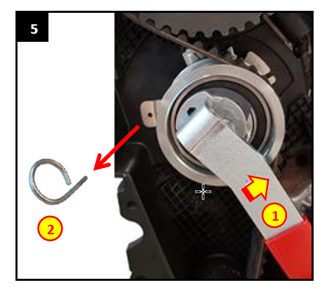
Picture 5: removing the retaining pin
Next up: removing the retaining pin. Once you’ve installed the timing belt, you can easily remove the pin by manipulating the tensioner adjuster in an anti-clockwise direction, using the tensioning tool (see the yellow arrow on the image below). NOTE: while you remove the retaining pin, always keep the adjuster in position using the tensioning tool!
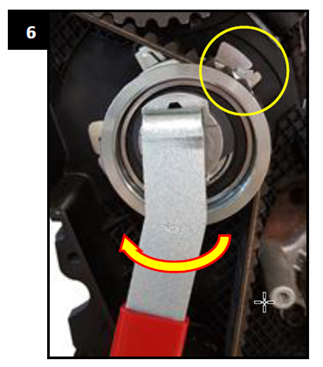
Picture 6: setting the belt tension
To make sure the belt is correctly tensioned, rotate the tensioner adjuster clockwise until the pointer is positioned in the middle of the window.
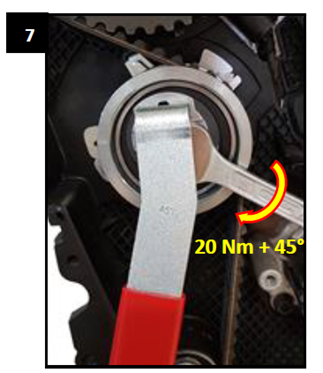
Picture 7: tightening the tensioner nut
To keep the belt in the position pictured above, tighten the tensioner nut using a torque wrench set to 20Nm + 45°.
That’s it, you’re all set!