Gates Industrial, with its extensive experience in engine power transmission systems, from traditional belts to recently incorporated timing chains, understands the vital importance of each engine component. The timing system, whether belt or chain driven, is the heart of engine synchronization, essential for its performance, efficiency, and longevity. Although timing chains are known for durability, they are not immune to wear and the know-how for a smooth repair is important.
The Timing Chain System and its Key Components
The timing chain system synchronizes, among other components, the rotation of the crankshaft (lower part of the engine) with the camshaft(s) (upper part), ensuring that the valves open and close at the precise moment relative to the piston's position. Its main components are:
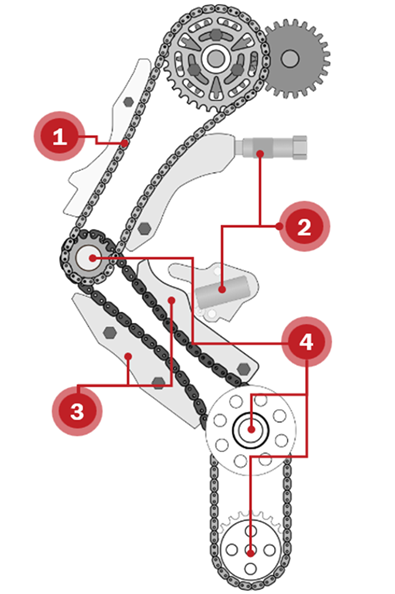
- Chain(s): A robust metallic component that accurately transmits motion between the sprockets. It undergoes natural wear and can stretch over time.
- Tensioner (Hydraulic or Mechanical): Maintains the correct tension on the chain, compensating for wear-related slack and absorbing vibrations. Hydraulic tensioners rely on engine oil pressure to function correctly.
- Guides/Shoes (Fixed and Pivoting/Movable): Parts designed to guide the chain's path, reduce noise, and prevent contact with other engine parts. They can wear out, crack, or break.
- Sprockets (Crankshaft and Camshaft): Toothed wheels that mesh with the chain. Wear on their teeth (visually identifiable by a sharp, 'hooked', or thinned shape) affects engagement and drastically accelerates chain deterioration.
What Are the Typical Symptoms That Require a Timing Chain Replacement?
While wear is natural with high mileage, certain factors can drastically accelerate the deterioration of the timing chain system and you should consider replace the chain kit when:
Poor Lubrication (The Most Critical Cause!)
- Incorrect Oil Quality or Type: The oil must have the viscosity and meet the exact specifications recommended by the manufacturer (API, ACEA standards, OEM specifications). Using an incorrect oil compromises lubrication capacity (creation of protective film between parts), can impede the optimal functioning of hydraulic tensioners, and will not offer the necessary additives to protect against the specific wear of the timing system.
- Exceeded Oil Change Intervals: The oil loses its properties, accumulates sludge, particles, and even moisture/water, which can accelerate corrosion and chain elongation, as well as obstruct oil passages crucial for hydraulic tensioners.
- Low Oil Level: Insufficient lubrication and cooling.
- Clogged or Poor-Quality Oil Filter: If the filter is clogged (e.g., from not being changed on time) or is of poor quality, it cannot effectively remove metallic particles and other abrasive contaminants from the oil. This dirty oil circulates through the system, literally sanding the timing components (chain, sprockets, guides) and potentially affecting the operation of hydraulic tensioners.
- Fuel Dilution of Oil (Diesel Engines with DPF): In modern diesel engines with a Diesel Particulate Filter (DPF), regeneration cycles sometimes involve fuel post-injections. Some of this fuel can seep into the oil pan, diluting the oil and significantly reducing its viscosity and lubricating capacity, which accelerates the wear of the chain and other timing system components.

- Tensioner Failures: The tensioner is crucial for maintaining correct tension and absorbing vibrations. It can fail for various reasons: hydraulic ones due to loss of oil pressure (from internal leaks, sludge blockage, faulty anti-drainback valve causing cold start rattle), and mechanical ones due to spring fatigue or breakage, or ratchet mechanism wear (if equipped). A tensioner failure causes insufficient tension, allowing the chain to vibrate excessively, hit against the guides ('chain slap'), and suffer uneven impact loads. This lack of control enormously accelerates the wear of the chain itself, the guides, and the sprocket teeth, besides significantly increasing the risk of the chain jumping timing.
What are the consequences of not replacing a worn timing chain?
When the chain elongates due to accumulated wear from use, this synchronization is progressively lost. Even a small misalignment can significantly alter the valve opening and closing timing relative to the piston position, affecting combustion and overall engine performance, which frequently leads to increased fuel consumption and higher polluting emissions, a critical aspect today. The symptoms of this condition, indicating the chain can no longer maintain precise timing, include:
- Metallic Rattling Noise: From the timing cover area, especially on startup, when cold, at idle, and it varies with RPM.
- Loss of Power: Poor performance, lack of power, hesitation.
- Misfires / Unstable Idle / Vibrations: Irregular running due to incorrect valve timing.
- Difficulty Starting or No Start: If the misalignment is severe or the chain has jumped teeth.
- Metal Shavings in Oil: A serious sign of excessive friction wear. Requires immediate diagnosis.
- Check Engine Light Illuminated: DTCs related with synchronization between Crankshaft and Camshaft (P0016, P0017, etc.)
Symptoms of a Faulty Chain Tensioner
The tensioner plays a crucial role in the longevity and proper functioning of the timing system. When it fails and cannot maintain adequate tension, it allows excessive slack that significantly accelerates the wear of the chain, sprockets, and guides, in addition to increasing the risk of the chain skipping a tooth. Direct symptoms of a faulty tensioner include:
- Noises Similar to a Stretched Chain: Rattling, perhaps more intermittent or pronounced during load changes or startup.
- Chain "Slap" Noise: If slack is excessive.
Symptoms of Faulty Chain Guides/Shoes
The guides direct the chain. Their failure manifests as:
- Critical Alert! Plastic Pieces in the Oil Pan: An unmistakable sign of breakage. Requires immediate inspection.
- Scraping or Rubbing Noises: If the chain rubs against metal due to complete wear of the guide surface.
- Increased General Noise: More vibration and chain noise as it is not properly guided.
- Risk of Jumping or Jamming: Potentially catastrophic consequences.
Complete Kit Replacement and Best Practices: The Key to a Reliable Repair
Faced with the symptoms described, the temptation might be to change only the failed component. However, this is a risky and unprofessional practice. Therefore, replacing the complete kit, always including the sprockets, ensures that all main wear components are replaced with high-quality parts designed to work in harmony, preventing premature failures and costly repeat labor.
Essential Best Practices During Replacement: Performing the kit replacement following best practices is as important as using quality components. Skipping these steps can compromise even the best repair:
- Thorough Cleaning: Before starting, clean the engine area. If broken guides were found, it is imperative to remove the oil pan and meticulously clean both the pan and the oil pump pickup screen/strainer to remove any plastic or metallic fragments. Omitting this step can cause a fatal lubrication obstruction shortly after the repair.
- Pre-Lubrication: Before installing the new chain and sprockets, apply a coat of clean engine oil to the chain and sprocket teeth to ensure adequate initial lubrication.
- Tensioner Preparation: Check if the new hydraulic tensioner requires any specific 'priming' procedure (initial oil fill or release of a transport lock/pin) according to the manufacturer's instructions, to ensure it applies tension correctly from startup.
- CRITICAL Manual Verification: Once the entire kit is assembled and initial tension is set, manually turn the engine over using an appropriate tool on the crankshaft bolt for at least two full revolutions (720° of crankshaft rotation). This step is VITAL to:
- Confirm there is no mechanical interference between valves and pistons (very important in interference engines).
- Re-check that all timing marks (crankshaft, camshaft(s)) align perfectly in the correct position upon completion of the rotations.
Final Tips and Maintenance Advice
- Use only the correct oil type (API/ACEA and OEM specifications).
- Change oil and filter at manufacturer-recommended intervals.
- Replace all chains, tensioners, guides, and sprockets together with a full kit.
- Don’t ignore engine noises—metallic rattles or cold start clatters are red flags.
Gates kits are designed for full compatibility and durability. Trust in OE-quality parts for long-lasting repairs
Conclusion
The timing chain is a fundamental part of your car's engine. While designed for durability, it's not immune to wear. Proper diagnosis, oil maintenance, and a full system overhaul are key to long-term engine reliability. When it’s time for replacement, don’t cut corners—choose complete timing chain kit replacement and follow best practices to protect your vehicle and your wallet.
FAQ
Is it worth replacing a timing chain?
Yes. Replacing a worn timing chain prevents major engine failure and ensures optimal performance.
When should a timing chain be replaced?
Typically after 100,000 miles or sooner if symptoms appear or oil maintenance has been poor.
Is there a warning before a timing chain breaks?
Yes—noises, engine misfires, or check engine lights are common signs.
What is the life expectancy of a timing chain?
With proper maintenance, a timing chain can last over 130,000 miles.