The PSA 1.5L HDi DV5 engine is widely used across Peugeot, Citroën, DS, Opel, Ford, and Toyota vehicles in Europe. Designed to meet Euro 6 emission standards, it delivers excellent fuel efficiency and reduced emissions. However, despite its modern design, the DV5 engine has shown recurring timing chain issues, particularly on early versions.
This technical guide explains:
- How the DV5 timing system works
- The most common DV5 timing chain problems
- How to identify early warning signs
- Best practices for maintenance and repair
- Why upgrading to the latest timing chain design is critical for long-term reliability
Understanding the DV5 Engine Architecture
- Engine block: Aluminum R4 with DOHC configuration
- Injection: Common Rail with high pressure Bosch CP 4.1
- Turbo: Fixed or variable geometry depending on variant
- Emission control:
- EGR valve: EGR lowers combustion temperature by recirculating exhaust gases, reducing nitrogen oxide emissions effectively.
- DPF (diesel particulate filter): DPF filters soot particles and regenerate periodically to maintain low particulate emissions.
- SCR (Selective Catalytic Reduction system):
- Timing system: Combination of belt and camshaft chain
DV5 Engine Power Transmission OE maintenance guidelines
- Timing Chain (TC): Inspection at 100,000 km or at cold-start noises
- Synchronous Belt Drive System (SBDS): Change interval 180000km/120 months
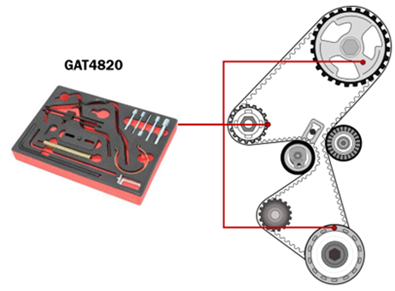
Timing Chain Upgrade

Timing chain function in an engine.
In this engine, the synchronisation between intake and exhaust camshaft is essential to ensure the correct opening and closing of the intake and exhaust valves.
The precision of these timing intervals ensures the correct filling of the combustion chamber with fresh air.
To learn more about the correct chain maintenance, refer to the article on our website:
https://www.gatestechzone.com/en/news/2025-06-chain-maintenance
Common DV5 Timing Chain problems
In this engine some well-known problems with the timing chain may occur in an early period of less than 100.000km/60.000 miles. To identify if the timing chain system has issues, look for the following signs:
- Unusual noises from the engine, such as rattling or whirring.
- Difficulty starting the engine or the engine not starting at all.
- Decreased engine performance and increased fuel consumption.
Check engine light illuminated on the dashboard (DTC Code P0017 or others stored in the ECU.
Gates Europe Timing chain upgrade
Gates has introduced an upgraded timing chain system to address these issues. The upgrade involves replacing the old 7mm chain with a more robust 8mm chain and its related components.
Steps to upgrade the timing chain system:
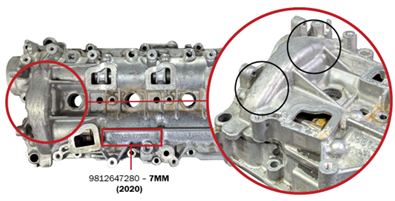
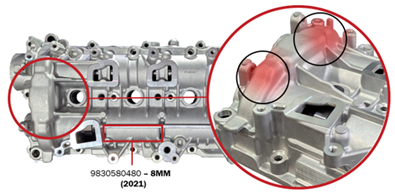
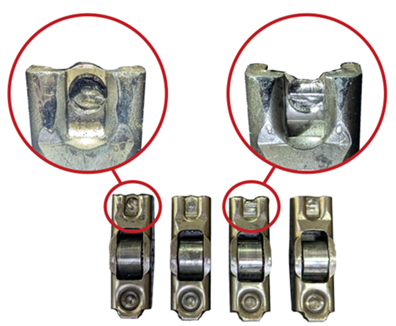
Identify the currently installed chain type:
Check the part number engraved on the camshaft bearing housing or check the protuberance of the valve cover as we explain below.
- If the valve cover does not have the bulges as indicated below or has the reference 9812647280 means the the old version of 7mm chain is installed and you should proceed to upgrade the components with the Gates CHK1047M chain kit (8mm).
- If the valve cover have the bulges as indicated below or has the reference 9830580480 means that the new upgraded version of 8mm chain is installed. In this case, if the engine is facing the above described signs, you should replace only the chain and tensioner with the kit number CHK1047MA.
Upgrade the timing chain
- In case the 7mm version is installed in the engine, an upgrade of the timing chain and related components Should be performed. In case the owner of the vehicle refuses a durable repair, 7mm chain is still serviceable but not recommended.
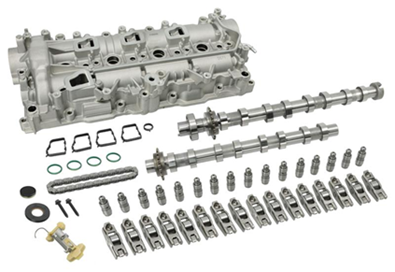
- The Gates upgraded kit includes the new 8 mm timing chain and tensioner, both camshafts (inlet and exhaust), the camshaft case, camshaft cover, and the retainer.

During the upgrade, it is essential to check the condition of following engine components:
- Valve rockers
- Springs
- Valve spring cups
- Valve rods (height and wear)
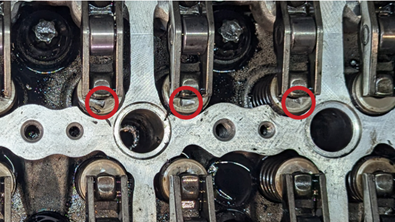
Pay close attention to valve rocker wear, as they can fail prematurely.
If the valve rockers show wear, install the CHK1047MB kit with the matching components
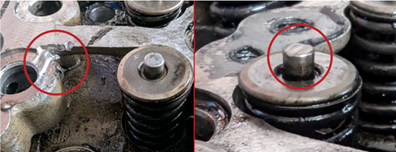
- If no visual faults are found, proceed with installing the upgraded kit.
- If any visual fault is detected (e.g., twisted valves), check the valve sealing to determine damage and repair as needed.
- If pieces of the tensioner or chain are missing and cannot be located, continue the repair—the oil pump strainer or oil pan will retain the fragments.
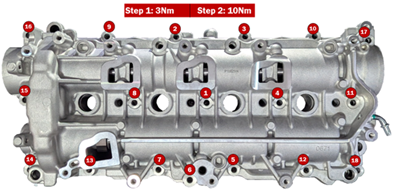
Once all visual checks and any required repairs are completed, reassemble the engine, making sure all components are installed and torqued according to the manufacturer’s specifications.
Importance of following the correct installation procedure for a new timing belt kit
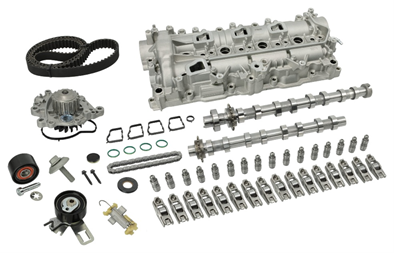
Since the timing belt must be removed to upgrade the timing chain kit, replacing it during the procedure is strongly recommended. For this reason, Gates provides a complete kit containing all required components.
This section does not cover the full installation, but highlights the key steps of the kit replacement.
Timing chain upgrade inspection checklist
Inspect the system for any dirt, debris, or oil leaks, and repair any defects before proceeding.
In newer Euro 6 engines like the DV5, the injection pump relies on extremely precise timing. After removing the necessary components, make sure the entire system is correctly timed using the appropriate locking tools.
Once proper timing is confirmed, you can continue with the replacement of the timing belt kit components.
Important timing belt tensioning procedure
One of the key steps in the kit installation is the tensioning process:
- Release the tensioner’s retaining pin only after the timing belt is installed.
- Remove the locking tools and rotate the adjuster plate (A) anticlockwise to move the tensioner index into the over‑tension zone (O).

- Without tightening the nut, rotate the adjuster (A) clockwise to bring the index into the nominal zone (N), then lightly tighten the nut.

· Rotate the crankshaft six times until the locking tools can be reinstalled.
· Loosen the tensioner nut and repeat the tensioning procedure.
· Refit all removed components and apply the correct torque settings.
DV5 Cooling System: Bleeding and Maintenance
The 1.5 HDi (DV5) engine is equipped with a dual‑circuit cooling system designed to optimise thermal regulation and prevent overheating. This “DV5R dual‑coolant system” features two separate but interconnected coolant loops:
- one dedicated to the main engine block, and
- one dedicated to the EGR cooler.
The primary cooling circuit circulates coolant from the engine block to the radiator, where heat is dissipated.
The secondary EGR circuit supplies coolant directly to the EGR valve and cooler to manage the high exhaust‑gas temperatures. This prevents the EGR cooler’s thermal load from affecting the main cooling circuit, ensuring stable operating temperatures and reduced emissions.
Because the water pump is replaced together with the SBDS kit, proper cooling‑system maintenance is essential to ensure correct operation.
Cooling System Maintenance Procedure
- Drain all old coolant to avoid mixing incompatible coolant types and flush the system to remove debris, corrosion, and contaminants. https://www.gatestechzone.com/en/news/2021-09-flushing-cooling-system
- Create a vacuum of –0.9 bar using a coolant‑circuit vacuum tool. Hold the vacuum for at least one minute and confirm it remains stable.
- Refill the cooling system with the coolant specified for the DV5 engine and allow the pressure to return to 0 bar.
- Using a diagnostic tool, select “Degassing of the engine cooling circuit.”
- Start the engine and run it at over 2300 rpm for 10 seconds.
- Then run the engine at 2500 rpm for approximately 20 minutes, allowing the cooling fan to complete two full on/off cycles.
- Disconnect the diagnostic tool and switch off the engine.
- Check the system for coolant leaks and allow the engine to cool completely.
- Once cold, verify the coolant level and top up if required.
Conclusion: Protecting DV5 Engine Reliability
The PSA 1.5L HDi DV5 engine is a highly efficient Euro 6 powertrain, but its early timing chain design requires careful attention. Upgrading from the original 7mm chain to the Gates 8mm timing chain system is a proven solution to prevent premature wear, engine damage, and costly downtime.
By combining:
- The correct timing chain upgrade
- Strict installation procedures
- Proper timing belt replacement
- Accurate cooling system maintenance
workshops and vehicle owners can ensure long-term DV5 engine reliability and performance.
Discover the Gates DV5 Timing Chain Kits and related solutions on our product pages.