The 1.6L and 2.0L 8V gasoline engines can be found in Volkswagen, Audi, Seat and Skoda models so, as a mechanic, you have probably come across them and their timing belt kits K015489XS or KP15489XS-1 / -2 before. (K015489XS contains a belt and tensioner, while the KP15489XS-1 and -2 sets add a water pump as well.) Is the timing belt tensioner noisy after installation? In this article, we explain how you can avoid this problem.
Analysis of noisy timing belt tensioners
The timing drive of the 1.6L and 2.0L 8V gasoline engines looks quite simple and its maintenance does not promise any difficulties at first glance. Yet mechanics often encounter a noise in the drive operation after a short run, most noticeable before the engine warms up to operating temperature. During diagnostics, the belt can also shift from the central position on the tensioner pulley towards the flange. A thorough analysis of these incidents revealed that, in most of the cases, the problem had a similar (and easy-to-avoid) cause.
Friction and a clicking sound
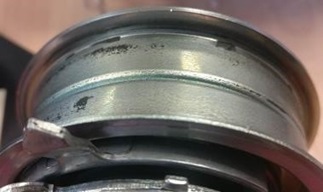
The noise turned out to be caused by friction of the belt on the pulley flange (which, in the long run, could have worse consequences than an annoying sound, as the belt could eventually jump on the pulley flange and suffer major damage). Visible black marks from belt material on the pulley are the evidence of such friction (see image).
In addition, some mechanics reported a clicking sound caused by impacts of the lever stop on the base plate stop.
To avoid such phenomena, you must follow two simple rules specified in the installation instructions for the drive.
The solution: 2 simple rules
First, make sure to correctly position the tensioner on the engine. To be more precise: the locating lug of the tensioner should be clearly in the slot on the engine.
Second, it is necessary to repeat the following cycle five times before your final tension adjustment: using the adjuster, turn the tensioner counterclockwise until it stops (maximum tension), then turn it back to its original position (minimum tension). This procedure is explained in the instruction manual, yet many mechanics omit it because they don’t see the point. However, this step allows the mechanism to take up the correct position and maintain the correct belt tension, so it is undoubtedly a crucial part of the installation procedure.